这是我的第一个项目,ThimbleKrox,它是一个顶针,可以让你通过食指(或任何手指)的移动来控制鼠标指针。
第 1 步:所需材料和工具
所需材料:
Arduino微
MPU-6050
用于连接 Arduino 和 PC 的电缆(微型 USB 到 USB)
跳线(连接 Arduino 和 MPU-6050)
一个松紧带(如果你想将 Arduino 连接到你的手上)
所需工具:
安装了 Arduino IDE 的计算机(用于启动 Arduino 中的代码)
烙铁(仅当 Arduino 未预先组装引脚连接器时)
3D 打印机(如果你想让你的顶针看起来很酷)
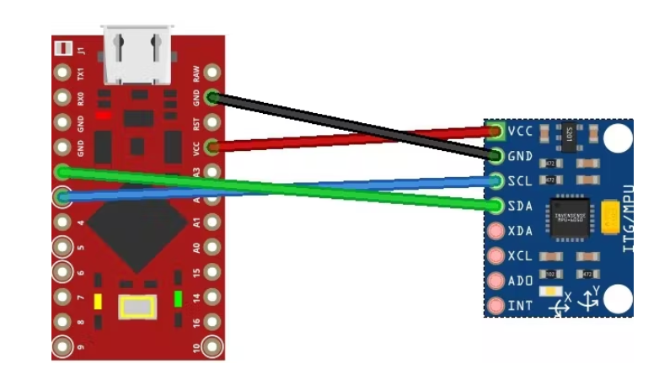
第 2 步:连接
将 arduino 的引脚连接到 MPU-6050 的引脚:
Arduino的引脚VCC到引脚VCC
引脚 GND 到 GND
引脚 2 到 SDA
引脚 3 到 SCL。
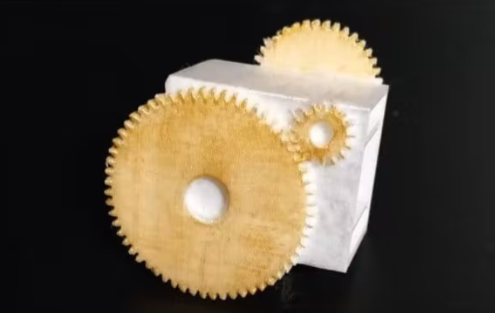
第 3 步:3D 打印(可选)
如果您希望您的顶针看起来不错,并且如果您有 3D 打印机,您可以打印物理顶针。
我做了两个版本,一个是透明的,因此不需要打印支撑并且不太笨重,第二个是我尝试用蒸汽朋克风格做的而不让它太笨重(它仍然比透明的更笨重一个),但是这个需要打印支持,并且只有在彩色时才能返回最好的(对于 PLA,我与蛋彩相处得很好)。两者都需要与底部有两个内部突起的部分一起打印
第 4 步:组装
使用 3D 打印顶针
要使用印刷顶针安装所有东西,连接后,必须将 MPU-6050 插入顶针的上腔内,将电缆容纳在下腔中
没有 3D 打印的顶针
在这种情况下,组装以更业余的方式完成,即将 MPU-6050 放置在感兴趣手指的最后一个方阵并用胶带或松紧带将其挡住。
第 5 步:编码和校准
运行代码的第一件事是安装所需的库,即Wire.h 、I2Cdev.h 、MPU6050.h和Mouse.h
完成此操作后,我建议加载 ThimbleKrox 校准代码,戴上顶针并打开串行监视器(Ctrl + Shift + M)。
您现在应该看到如下内容:
right | gx = 3165 gy = 469 gz = -1055 | ax = 15232 ay = 2064 az = -4496
如果正确校准,您希望指针移动的方向显示在哪里,然后是校准所需的一些值。
现在您必须重新打开代码并转到标有“//校准线”的行并更改数值,直到获得正确的方向。(每次更改代码中的值时,都需要在 Arduino 中重新上传)
串行监视器:
left | gx = 3165 gy = 469 gz = -1055 | ax = 5232 ay = 2064 az = -4496
校准代码:
if (ax> = 15000) { // calibration line
right ();
}串行监视器标记为“左”,但我们希望将此行标记为“右”,因此我们需要将“15000”值更改为“5000”。这是因为,在这种情况下,我们必须确保检测到的“ax”大于代码中的值。我们知道它必须更大,因为在代码中有一个主要标志,我们必须查看串行监视器的“ax”,因为在代码中有“ax”。(只需更改代码的数值)
在 Arduino 中重新加载代码后,我们将拥有:
串行监视器:
right | gx = 3165 gy = 469 gz = -1055 | ax = 5232 ay = 2064 az = -4496
校准代码:
if (ax> = 5000) { // calibration line
right ();
}当校准代码中的所有校准线都已调整,因此校准版本顶针起作用时,必须调整主代码的值以匹配校准代码。
校准代码:
if (ax> = 5000) { // calibration line
right ();
}主要代码:
if (ax> = 15000) { // calibration line
right ();
}主代码必须更改为:
if (ax> = 5000) { // calibration line
right ();
}现在是时候上传主代码了
第 6 步:完成项目
现在是时候戴上你的手指控制鼠标用它玩 PC 游戏了!ThimbleKrox code:
//Code to control the mouse pointer through the movement of a finger
//To calibrate the device run “ThimbleKrox calibration code” and follow the tutorial found at https://www.hackster.io/projects/dd8881/
//The lines that need to be changed for calibration have “//calibration line”
//code write by Magform#include
#include
#include
#includeMPU6050 mpu;
int16_t ax, ay, az, gx, gy, gz;
int vx, vy;
int sensibility=10; //Change this value to change the sensitivity of the device
void setup() {
Serial.begin(9600);
Wire.begin();
mpu.initialize();
if (!mpu.testConnection()) { //check connection with the MPU-6050, if there is no connection stop to work
while (1);
}
}void up(){
Mouse.move(0, -sensibility);
}
void down(){
Mouse.move(0, sensibility);
}
void left(){
Mouse.move(-sensibility, 0);
}
void right(){
Mouse.move(sensibility, 0);
}void loop() {
mpu.getMotion6(&ax, &ay, &az, &gx, &gy, &gz);
if(ax>=15000){ //calibration line
right();
}
if(ax<=-9000){ //calibration line
left();
}
if(ay<=-8000){ //calibration line
up();
}
if(ay>=10000){ //calibration line
down();
}//uncomment the following lines to set the right click with a sprint up and the left click with a sprint down (Work in progress part)
/*
if(gy>=20000){ //calibration line
Mouse.click(MOUSE_RIGHT);
delay(100);
}
if(gy<=-20000){ //calibration line
Mouse.click(MOUSE_LEFT);
delay(100);
}
*/delay(10);
}免责声明:文章内容来自互联网,本站不对其真实性负责,也不承担任何法律责任,如有侵权等情况,请与本站联系删除。
转载请注明出处:分享一个通过食指的移动来控制鼠标指针的项目-沟通过程取得成功的关键环节 https://www.yhzz.com.cn/a/7546.html