本文来源电子发烧友社区,作者:码农爱学习, 帖子地址:https://bbs.elecfans.com/jishu_2308719_1_1.html
上篇文章,测试了EASY EAI Nano的人脸检测功能,本篇进行人脸识别功能。人脸检测,只是将图像中的人脸的位置检测出来,人脸识别,又增加了一部,在检测到人脸后,还要识别出这张脸是谁的脸。
本篇参考官方文档:
https://www.easy-eai.com/document_details/3/110
 1 API介绍
组件
头文件以及库路径
描述
系统操作组件
easyeai-api/common_api/system_opt
提供线程操作函数
摄像头组件
easyeai-api/peripheral_api/camera
提供摄像头操作函数
显示屏组件
easyeai-api/peripheral_api/display
提供显示屏操作函数
平面几何组件
easyeai-api/algorithm_api/geometry
提供简单几何运算函数
人脸检测组件
easyeai-api/algorithm_api/face_detect
提供人脸检测操作函数
人脸校正组件
easyeai-api/algorithm_api/face_alignment
提供人脸校正操作函数
人脸识别组件
easyeai-api/algorithm_api/face_recognition
提供人脸识别操作函数
1 API介绍
组件
头文件以及库路径
描述
系统操作组件
easyeai-api/common_api/system_opt
提供线程操作函数
摄像头组件
easyeai-api/peripheral_api/camera
提供摄像头操作函数
显示屏组件
easyeai-api/peripheral_api/display
提供显示屏操作函数
平面几何组件
easyeai-api/algorithm_api/geometry
提供简单几何运算函数
人脸检测组件
easyeai-api/algorithm_api/face_detect
提供人脸检测操作函数
人脸校正组件
easyeai-api/algorithm_api/face_alignment
提供人脸校正操作函数
人脸识别组件
easyeai-api/algorithm_api/face_recognition
提供人脸识别操作函数
主要来看下人脸识别组件。
face_recognition.h的主要内容
复制//人脸识别初始化函数 int face_recognition_init(rknn_context *ctx, const char * path); //人脸识别执行函数 int face_recognition_run(rknn_context ctx, cv::Mat *face_image, float (*feature)[512]); //人脸识别特征比对函数 float face_recognition_comparison(float *feature_1, float *feature_2, int output_len); //人脸识别释放函数 int face_recognition_release(rknn_context ctx);一些参数:
ctx:输入参数,rknn_context句柄 path:输入参数,算法模型路径 face_image:输入参数,图像数据输入(cv::Mat是Opencv的类型) feature:输出参数,算法输出的人脸特征码face_alignment.h的主要内容
复制cv::Mat face_alignment(cv::Mat img, cv::Point2f* points);geometry.h的主要内容
复制typedef struct{ float x; float y; }fPoint_t; typedef struct{ float left; //x1 float top; //y1 float right; //x2 float bottom; //y2 }fRect_t; typedef struct{ int32_t x; int32_t y; }s32Point_t; typedef struct{ int32_t left; //x1 int32_t top; //y1 int32_t right; //x2 int32_t bottom; //y2 }s32Rect_t; //判断点是否在矩形内 extern bool point_in_rect(s32Point_t point, s32Rect_t rect); //计算矩形面积 extern int32_t calc_rect_square(s32Rect_t rect); //找出面积较小矩形 extern s32Rect_t min_rect(s32Rect_t rect1, s32Rect_t rect2); //找出面积较大矩形 extern s32Rect_t max_rect(s32Rect_t rect1, s32Rect_t rect2); //判断矩形是否相交或相切 extern bool rect_is_intersect(s32Rect_t rect1, s32Rect_t rect2); //计算两矩形相交部分面积(若相切,面积也为0) extern int32_t calc_rect_intersect_square(s32Rect_t rect1, s32Rect_t rect2); //计算[两矩形相交部分面积]与[小矩形面积]之比 extern double calc_intersect_of_min_rect(s32Rect_t rect1, s32Rect_t rect2); //计算两矩形的交并比 extern double calc_intersect_of_union(s32Rect_t rect1, s32Rect_t rect2); 2 代码分析与修改主要的修改是将红外摄像头采集和活体检测去掉,改用外接RGB摄像头,另外,识别结果的显示,将更多的信息(识别的id,人物名称,耗时等)展示在屏幕上。
2.1 图像采集与显示线程(主线程)
重新定义识别结果:
复制typedef struct{ bool bHasFace; //是否检测到人脸 bool bMatch; //是否与注册的人脸匹配 char idStr[128]; //匹配的人脸的id char nameStr[128]; //匹配的人脸的名称 float similarity; //匹配的相似度 uint64_t useTime; //匹配用时 uint32_t x1; //识别到的人脸框的4个点 uint32_t y1; uint32_t x2; uint32_t y2; }Result_t;官方例程用到了红外摄像头,用于活体检测,此次测试,为了使用电脑屏幕上的人物图片进行人脸检测,去掉了活体检测功能,并换做只使用USB摄像头采集RGB图像进行人脸识别。
主函数逻辑如下,和上篇进行人脸检测的代码逻辑类似。
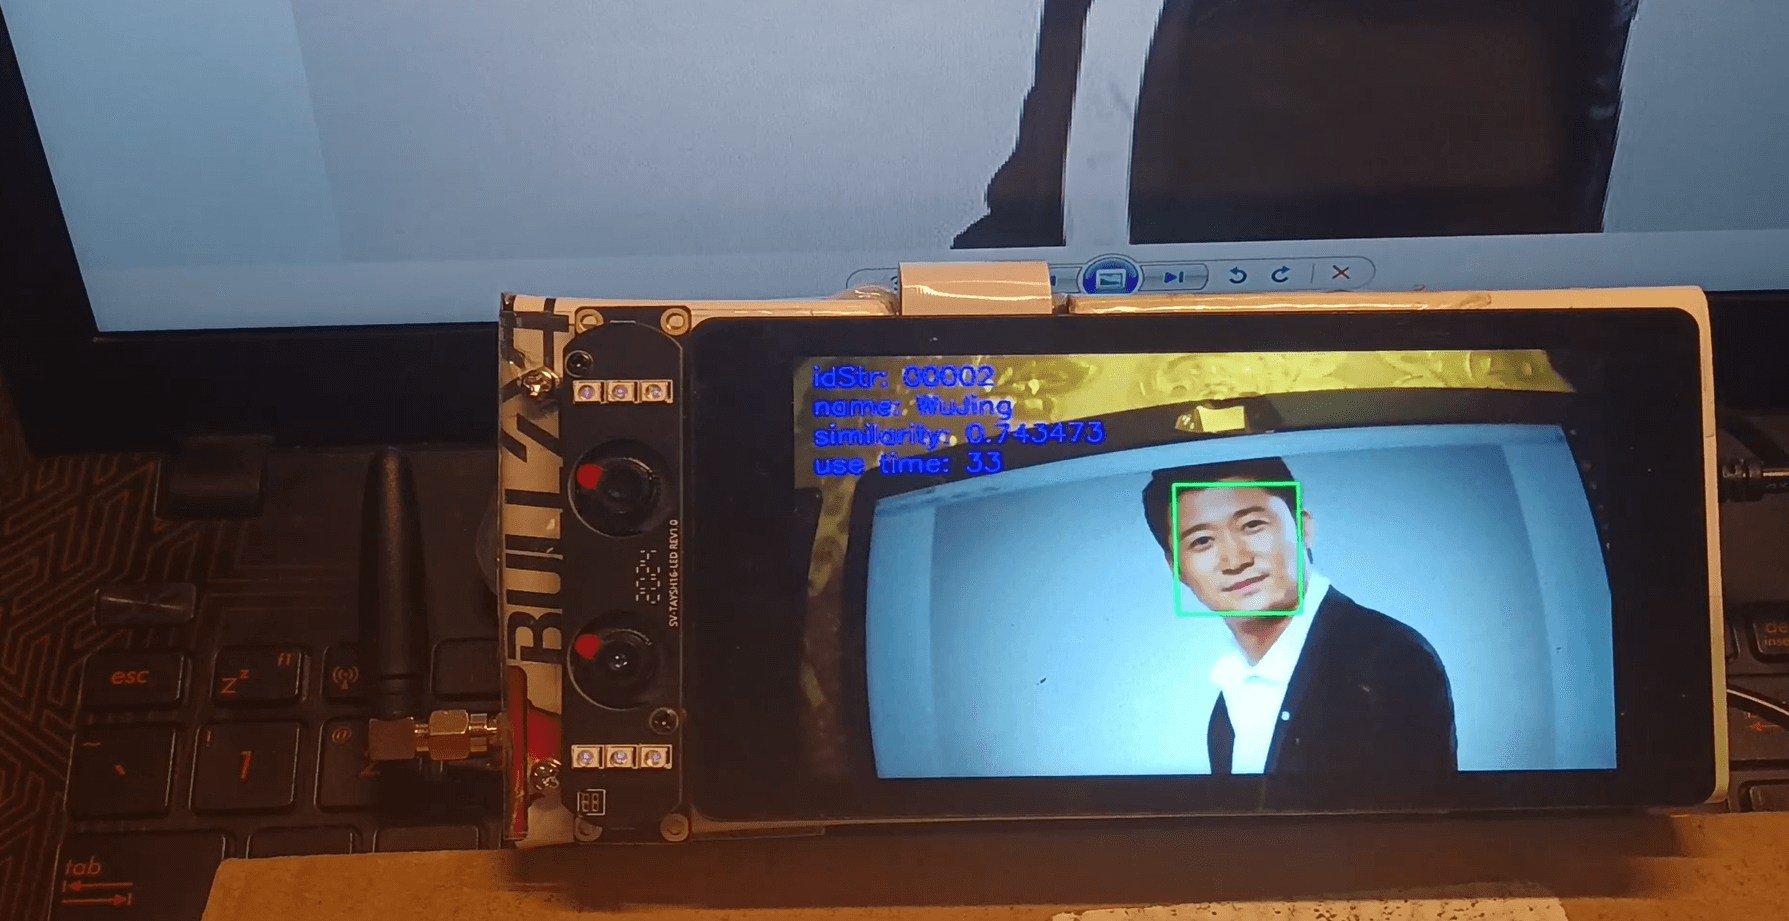
复制#define COLOR_RED Scalar(255, 0, 0) #define COLOR_GREEN Scalar(0, 255, 0) int main(int argc, char **argv) { int ret = 0; int rgbRet = 0; disp_screen_t screen = {0}; char *pRGBbuf = NULL; int skip = 0; pthread_t mTid; Result_t *pResult = NULL; Mat image; // 1.打开USB摄像头 ret = usbcamera_init(USB2_0, USB_DIRECT, CAMERA_WIDTH, CAMERA_HEIGHT, 180); if (ret) { printf(“error: %s, %dn”, __func__, __LINE__); goto exit_donothing; } pRGBbuf = NULL; pRGBbuf = (char *)malloc(IMAGE_SIZE); if (!pRGBbuf) { printf(“error: %s, %dn”, __func__, __LINE__); ret = -1; goto exit_freeusb; } // 跳过前10帧 skip = 10; while(skip–) { ret = usbcamera_getframe(USB2_0, USB_DIRECT, pRGBbuf); if (ret) { printf(“error: %s, %dn”, __func__, __LINE__); goto exit_freeusb_freebuf; } } // 2.创建识别线程,以及图像互斥锁 pthread_mutex_init(&img_lock, NULL); pResult = (Result_t *)malloc(sizeof(Result_t)); if(NULL == pResult){ goto exit_free_all; } memset(pResult, 0, sizeof(Result_t)); if(0 != CreateNormalThread(detect_thread_entry, pResult, &mTid)){ free(pResult); } // 3.显示初始化 screen.screen_width = SCREEN_WIDTH; screen.screen_height = SCREEN_HEIGHT; screen.wins[0].enable = 1; screen.wins[0].in_fmt = IMAGE_TYPE_RGB888; screen.wins[0].in_w = CAMERA_WIDTH; screen.wins[0].in_h = CAMERA_HEIGHT; screen.wins[0].rotation = 90; screen.wins[0].win_x = 0; screen.wins[0].win_y = 0; screen.wins[0].win_w = 720; screen.wins[0].win_h = 1280; ret = disp_init_pro(&screen); if (ret) { printf(“error: %s, %dn”, __func__, __LINE__); goto exit_free_all; } // 4.(取流 + 显示)循环 while(1) { // 4.1、取流 pthread_mutex_lock(&img_lock); ret = usbcamera_getframe(USB2_0, USB_DIRECT, pRGBbuf); if (0 != rgbRet) { printf(“error: %s, %dn”, __func__, __LINE__); pthread_mutex_unlock(&img_lock); continue; } algorithm_image = Mat(CAMERA_HEIGHT, CAMERA_WIDTH, CV_8UC3, pRGBbuf); image = algorithm_image.clone(); pthread_mutex_unlock(&img_lock); // 4.2、显示 if (pResult->bHasFace) //检测到人脸 { Scalar color; //识别到已注册的人脸 if(pResult->bMatch) { color = COLOR_GREEN; cv::putText(image, std::string(“idStr: “) + std::string(pResult->idStr), cv::Point2f(30, 50), cv::FONT_HERSHEY_SIMPLEX, 1.45, CV_RGB(255,0,0),3.0); cv::putText(image, std::string(“name: “) + std::string(pResult->nameStr), cv::Point2f(30, 100), cv::FONT_HERSHEY_SIMPLEX, 1.45, CV_RGB(255,0,0),3.0); cv::putText(image, std::string(“similarity: “) + std::to_string(pResult->similarity), cv::Point2f(30, 150), cv::FONT_HERSHEY_SIMPLEX, 1.45, CV_RGB(255,0,0),3.0); cv::putText(image, std::string(“use time: “) + std::to_string(pResult->useTime), cv::Point2f(30, 200), cv::FONT_HERSHEY_SIMPLEX, 1.45, CV_RGB(255,0,0),3.0); } else { color = COLOR_RED; cv::putText(image, std::string(“unknow face”), cv::Point2f(30, 50), cv::FONT_HERSHEY_SIMPLEX, 1.45, CV_RGB(0,0,255),3.0); } // 画框 rectangle(image, Point(pResult->x1, pResult->y1), Point(pResult->x2, pResult->y2), color, 3); } disp_commit(image.data, IMAGE_SIZE); usleep(20*1000); } exit_free_all: pthread_mutex_destroy(&img_lock); exit_freeusb_freebuf: free(pRGBbuf); pRGBbuf = NULL; exit_freeusb: usbcamera_exit(USB2_0, USB_DIRECT); exit_donothing: return ret; }2.2 人脸识别处理
去掉红外摄像头的活体检测逻辑,只使用USB摄像头的图像进行人脸识别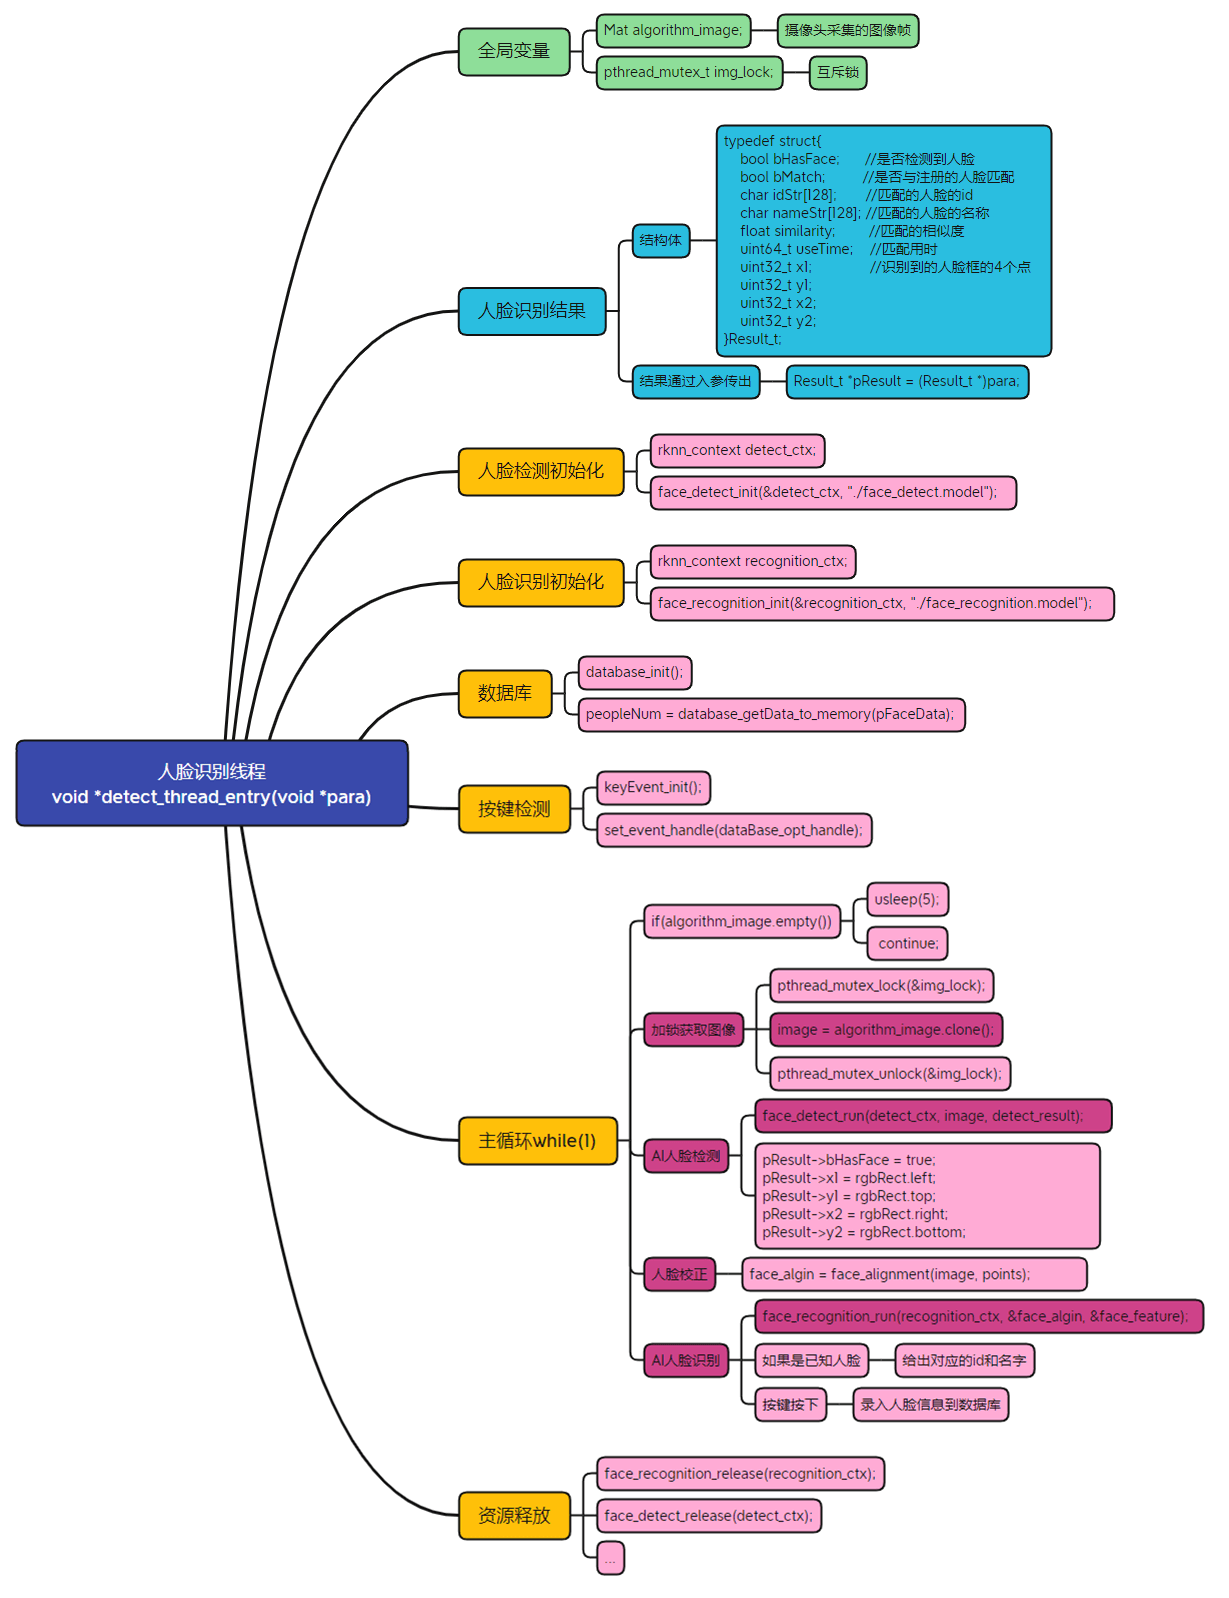
测试视频见文章底部视频,这里再放一张测试图片: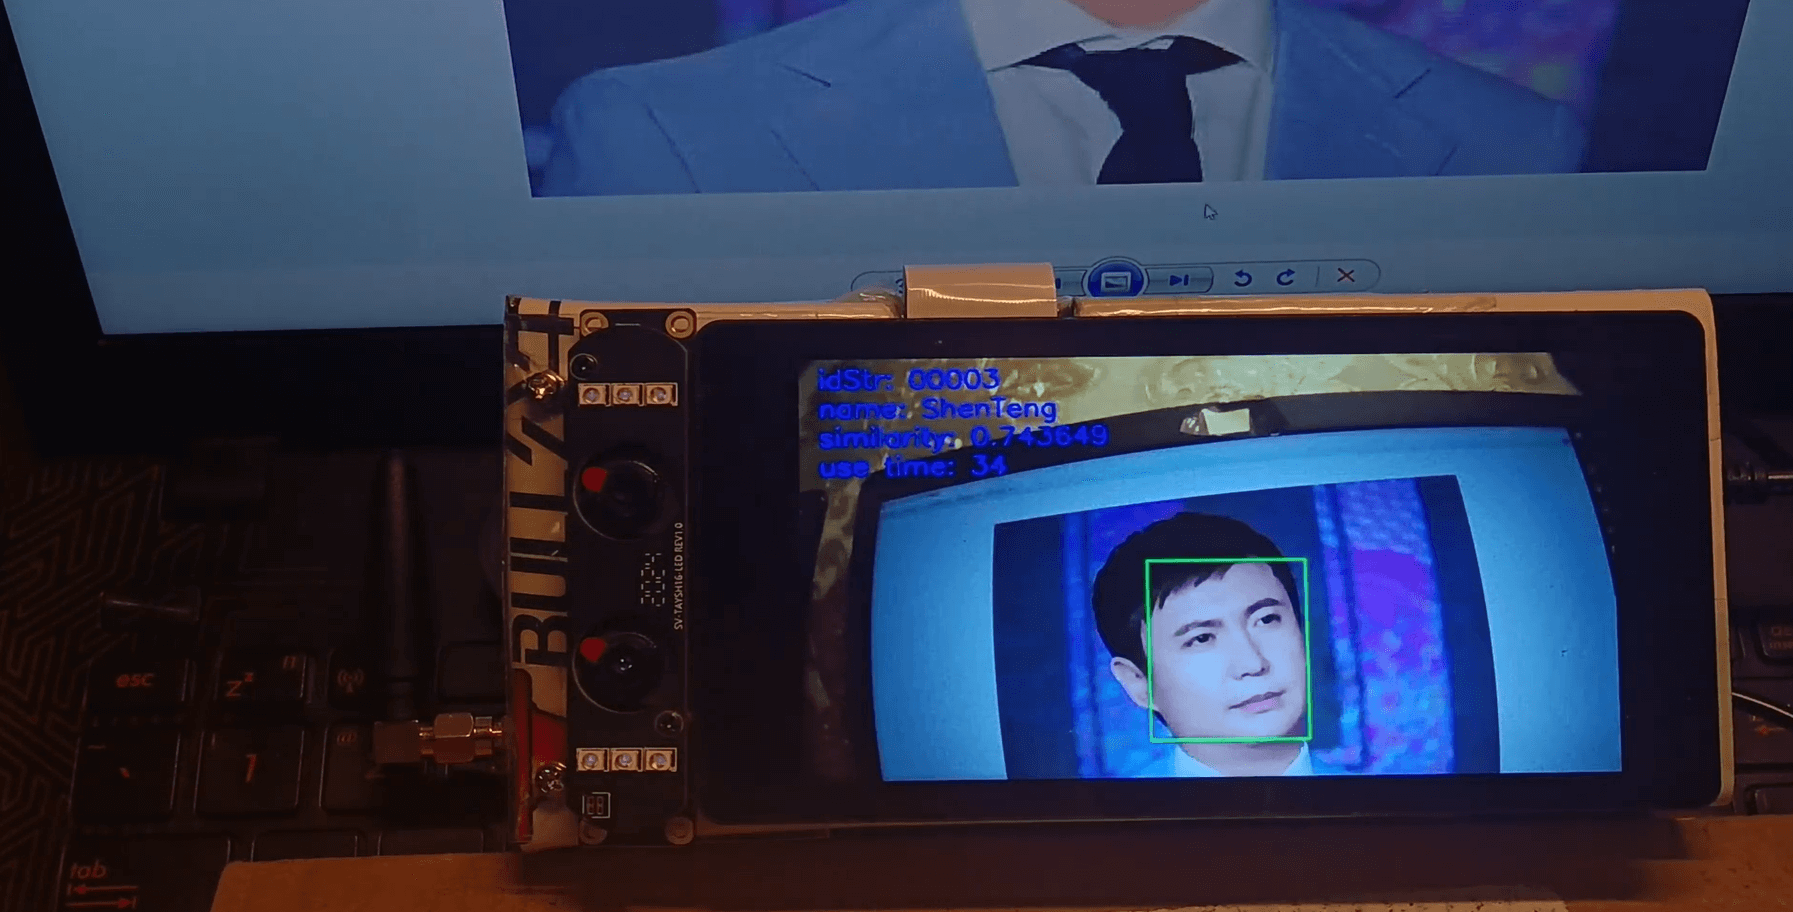
本篇介绍了EASY EAI Nano的人脸识别功能,与上篇的人脸检测相比,在检测到有人脸的基础上,通过先录入人脸显示到数据库,可以对比当前识别的谁的脸,实际测试,去掉活体检测功能后,通过外接USB摄像头来识别电脑屏幕上的3个人的多张不同人脸,可以分辨出不同人的人脸。
———– 附上EASY EAI Nano多人脸识别测试【视频】,详见作者原帖子内容。免责声明:文章内容来自互联网,本站不对其真实性负责,也不承担任何法律责任,如有侵权等情况,请与本站联系删除。
转载请注明出处:【EASY EAI Nano开源套件试用体验】5AI功能测试之多人脸识别-最好的开源人脸识别 https://www.yhzz.com.cn/a/6888.html