上一篇文章AI社交距离检测器:使用OpenCV中处理图像我们学习了如何从摄像头和视频文件中读取、写入和显示图像和视频,以及使用OpenCV对图像进行加载、写入和显示,以及视频流读写的基本操作。
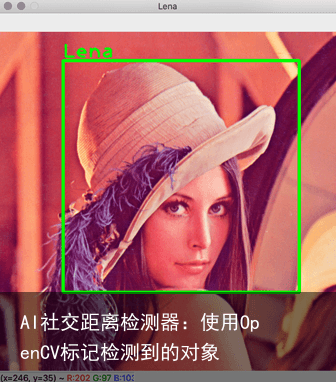
在本文中,将学习如何使用OpenCV标注检测到的对象。如下所示。在对象检测器训练期间,通常需要这样做来指示训练和测试数据集中的图像中的对象。
OpenCV提供了一种方法,使可以在图像中选择形状。也就是说,可以用OpenCV显示的窗口中,使用鼠标回调(imshow或namedWindow方法)。就可以检测用户何时单击鼠标按钮以及将指针放在何处。
下面将展示如何使用OpenCV和Python来响应鼠标事件。
公共模块
为了对代码中使用的各种常量进行分组,我创建了Common.py模块:
import cv2 as opencv LENA_FILE_PATH = ../Images/Lena.png WINDOW_NAME = Lena # Colors (BGR) GREEN = (0, 255, 0) LINE_THICKNESS = 3 # Image labeling parameters FONT_FACE = opencv.FONT_HERSHEY_PLAIN FONT_SCALE = 2 FONT_THICKNESS = 2 FONT_LINE = opencv.LINE_AA TEXT_OFFSET = 4该模块定义了几个常量:
LENA_FILE_PATH-指向Lena图像的位置。 WINDOW_NAME-存储窗口名称。 GREEN和LINE_THICKNESS-定义用于绘制矩形的颜色(BGR格式)和线条厚度。 FONT_FACE, FONT_SCALE用于显示对象标签的参数。 TEXT_OFFSET-定义标签与矩形之间的间隙(以像素为单位)。鼠标回调
要处理与OpenCV窗口的鼠标交互,可以设置鼠标回调。为此,首先使用namedWindow函数:
import cv2 as opencv import common opencv.namedWindow(common.WINDOW_NAME)然后,调用setMouseCallback:
opencv.setMouseCallback(common.WINDOW_NAME, on_mouse_move)回调应该具备以下原型:
def on_mouse_move(event, x, y, flags, param)以下是五个输入参数:
event鼠标事件EVENT_LBUTTONDOWN, EVENT_LBUTTONUP, EVENT_MOUSEWHEEL, EVENT_RBUTTONDBLCLK. x, y-鼠标光标的坐标。 flags-指示鼠标按钮是否已按下的标志(EVENT_FLAG_LBUTTON, EVENT_FLAG_RBUTTON, EVENT_FLAG_MBUTTON)或者用户按Ctrl(EVENT_FLAG_CTRLKEY),Shift(EVENT_FLAG_SHIFTKEY)或Alt(EVENT_FLAG_ALTKEY). param-可选参数。一旦设置了回调,只要鼠标事件被触发,OpenCV就会调用它。若要让用户选择对象,可以编写on_mouse_move回调如下:
rectangle_points = [] def on_mouse_move(event, x, y, flags, param): # User pressed left mouse button and started drawing the rectangle if(event == opencv.EVENT_LBUTTONDOWN): rectangle_points.clear() rectangle_points.append((x,y)) # User has finished drawing the rectangle elif event == opencv.EVENT_LBUTTONUP: rectangle_points.append((x,y)) display_lena_image(True)上面的函数存储由用户选择的矩形的两个坐标(两个相对的角)。当用户按下鼠标左键时,回调调用下面两个语句:
rectangle_points.clear() rectangle_points.append((x,y))首先清除坐标列表,然后通过读取x和y通过OpenCV传递给回调的参数。这些坐标表示矩形的第一个角。然后,用户按住鼠标左键,将光标移动到相对矩形的角。然后,用户必须释放鼠标左键,该按钮将调用on_mouse_move回调函数:
rectangle_points.append((x,y)) display_lena_image(True)第一个语句将追加x, y鼠标光标到rectangle_points名单。第二个语句将使用以下方法显示Lena图像:
def display_lena_image(draw_rectangle): # File path file_path = common.LENA_FILE_PATH # Load image lena_img = opencv.imread(file_path) # Draw rectangle if(draw_rectangle): draw_rectangle_and_label(lena_img, Lena) # Show image opencv.imshow(common.WINDOW_NAME, lena_img) opencv.waitKey(0)这个display_lena_image上面显示的函数使用OpenCV的imread方法从文件中读取图像。然后,函数检查输入参数是否draw_rectangle是True。如果是的话,display_lena_image在向用户显示最终图像之前,将绘制用户选择的矩形。为了显示图像,我使用imshow方法和waitKey等待用户按任意键后执行以下操作。
绘制矩形和标签
为了绘制用户选择的矩形,我实现了draw_rectangle_and_label函数:
def draw_rectangle_and_label(img, label): opencv.rectangle(img, rectangle_points[0], rectangle_points[1], common.GREEN, common.LINE_THICKNESS) text_origin = (rectangle_points[0][0], rectangle_points[0][1] – common.TEXT_OFFSET) opencv.putText(img, label, text_origin, common.FONT_FACE, common.FONT_SCALE, common.GREEN, common.FONT_THICKNESS, common.FONT_LINE)上面的方法使用了两个OpenCV函数:rectangle和putText.
第一个,顾名思义,画矩形。
第二个函数,putText,用于在矩形上方写入标签。
把东西放在一起
我将上面的函数组合成一个Python脚本:
import cv2 as opencv import common rectangle_points = [] def draw_rectangle_and_label(img, label): # Definition of the draw_rectangle_and_label def display_lena_image(draw_rectangle): # Definition of the display_lena_image def on_mouse_move(event, x, y, flags, param): # Definition of the on_mouse_move # Prepare window and set mouse callback opencv.namedWindow(common.WINDOW_NAME) opencv.setMouseCallback(common.WINDOW_NAME, on_mouse_move) # Display Lena image display_lena_image(False)要测试应用程序,只需运行notations.py即可。代码将创建窗口,设置鼠标回调,然后在没有任何标签的情况下显示Lena图像。然后选择矩形,将在应用程序绘制图像,然后设置标签。
总结
我们学习了如何在OpenCV中使用鼠标回调来选择图像中的各种对象。此功能通常用于准备测试数据集,并指示检测到的对象。在下一篇文章中,我们将使用绘图函数来标识检测到的对象。
免责声明:文章内容来自互联网,本站不对其真实性负责,也不承担任何法律责任,如有侵权等情况,请与本站联系删除。
转载请注明出处:AI社交距离检测器:使用OpenCV标记检测到的对象 https://www.yhzz.com.cn/a/13500.html