本文简介如何使用captcha_trainer开源框架来进行验证码识别训练。 
项目下载地址: https://github.com/kerlomz/captcha_trainer
安装
跟随 requirements.txt 文件一键安装或者自行安装。 安装完成之后,在app.py文件启动界面。
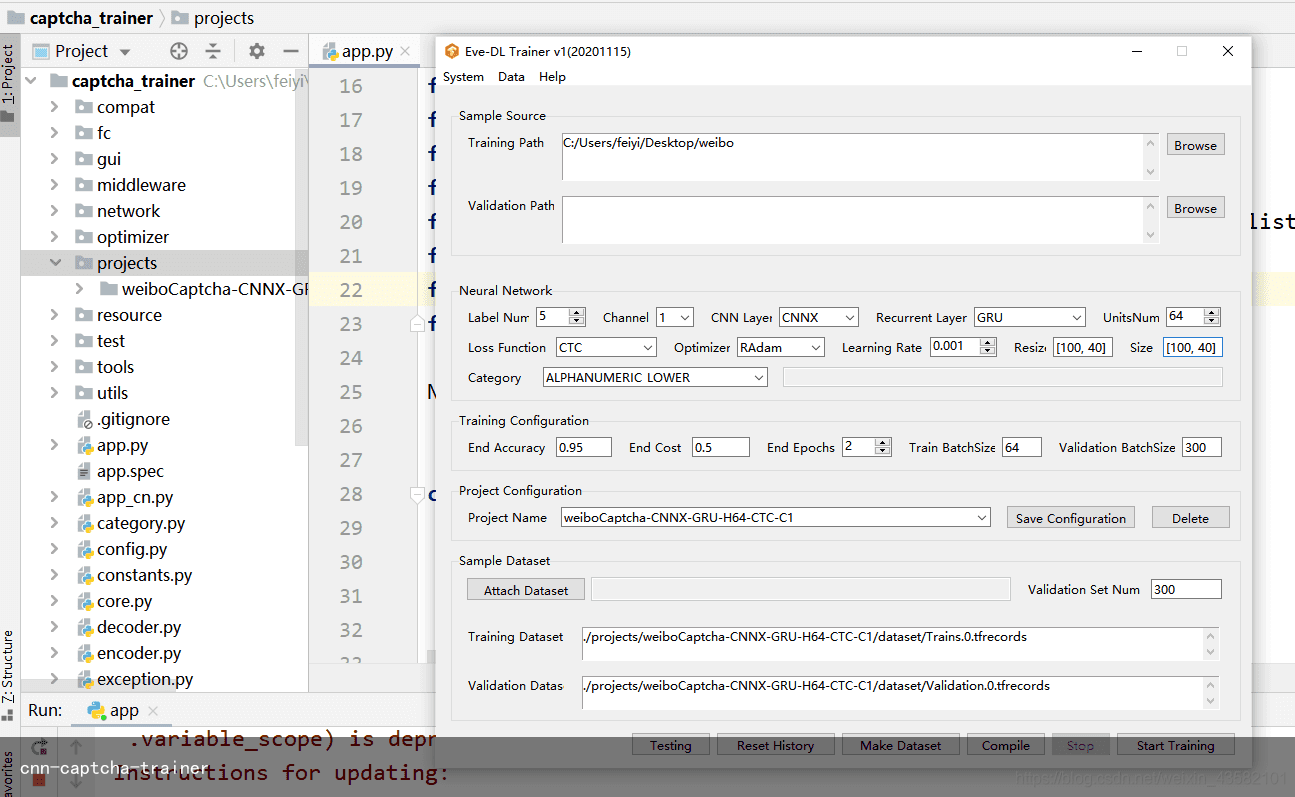
GUI界面中的功能介绍: 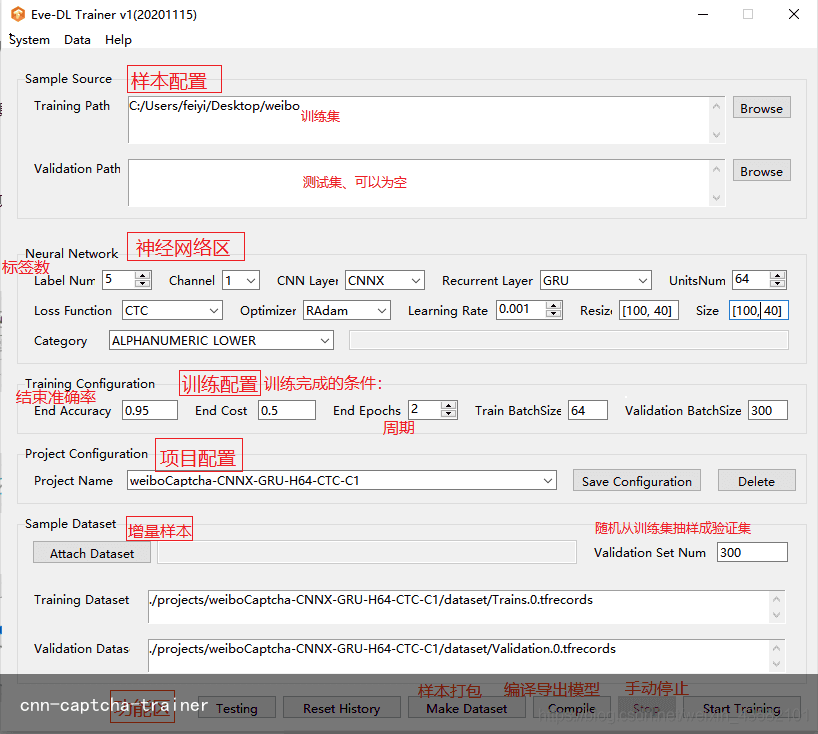
在app.py中可以看到详细代码和描述
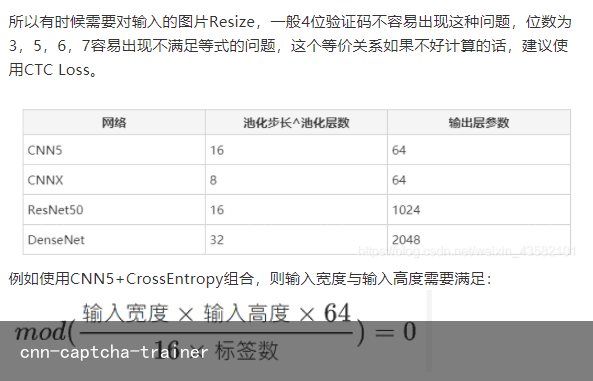
# 训练集源路径 – 标签 self.dataset_train_path_text # 训练集源路径 – 输入控件 self.source_train_path_listbox # 训练集源路径 – 按钮 self.btn_browse_train # 验证集源路径 – 标签 self.label_edge # 验证集源路径 – 输入控件 self.source_validation_path_listbox # 训练集源路径 – 按钮 self.btn_browse_validation # 卷积层 – 下拉框 self.comb_neu_cnn # 循环层 – 标签 self.neu_recurrent_text # 循环层 – 下拉框 self.comb_recurrent # 循环层单元数 – 标签 self.units_num_text # 损失函数 – 标签 self.loss_func_text # 损失函数 – 下拉框 self.comb_loss # 优化器 – 标签 self.optimizer_textnetwork中网络实现:
CNN.py DenseNet.py GRU.py LSTM.py MobileNet.py ResNet.py 比如LSTM: import tensorflow as tf from config import RunMode, ModelConfig from network.utils import NetworkUtils class LSTM(object): “”” LSTM 网络实现 “”” def __init__(self, model_conf: ModelConfig, inputs: tf.Tensor, utils: NetworkUtils): “”” :param model_conf: 配置 :param inputs: 网络上一层输入 tf.keras.layers.Input / tf.Tensor 类型 :param utils: 网络工具类 “”” self.model_conf = model_conf self.inputs = inputs self.utils = utils self.layer = None def build(self): “”” 循环层构建参数 :return: 返回循环层的输出层 “”” with tf.keras.backend.name_scope(LSTM): mask = tf.keras.layers.Masking()(self.inputs) self.layer = tf.keras.layers.LSTM( units=self.model_conf.units_num * 2, return_sequences=True, input_shape=mask.shape, dropout=0.2, recurrent_dropout=0.1 ) outputs = self.layer(mask, training=self.utils.is_training) return outputs class BiLSTM(object): def __init__(self, model_conf: ModelConfig, inputs: tf.Tensor, utils: NetworkUtils): “””同上””” self.model_conf = model_conf self.inputs = inputs self.utils = utils self.layer = None def build(self): “””同上””” with tf.keras.backend.name_scope(BiLSTM): mask = tf.keras.layers.Masking()(self.inputs) self.layer = tf.keras.layers.Bidirectional( layer=tf.keras.layers.LSTM( units=self.model_conf.units_num, return_sequences=True, ), input_shape=mask.shape, ) outputs = self.layer(mask, training=self.utils.is_training) return outputs class LSTMcuDNN(object): def __init__(self, model_conf: ModelConfig, inputs: tf.Tensor, utils: NetworkUtils): “””同上””” self.model_conf = model_conf self.inputs = inputs self.utils = utils self.layer = None def build(self): “””同上””” with tf.keras.backend.name_scope(LSTM): self.layer = tf.keras.layers.CuDNNLSTM( units=self.model_conf.units_num * 2, return_sequences=True, ) outputs = self.layer(self.inputs, training=self.utils.is_training) return outputs class BiLSTMcuDNN(object): def __init__(self, model_conf: ModelConfig, inputs: tf.Tensor, utils: NetworkUtils): “””同上””” self.model_conf = model_conf self.inputs = inputs self.utils = utils self.layer = None def build(self): “””同上””” with tf.keras.backend.name_scope(BiLSTM): self.layer = tf.keras.layers.Bidirectional( layer=tf.keras.layers.CuDNNLSTM( units=self.model_conf.units_num, return_sequences=True ) ) outputs = self.layer(self.inputs, training=self.utils.is_training) return outputs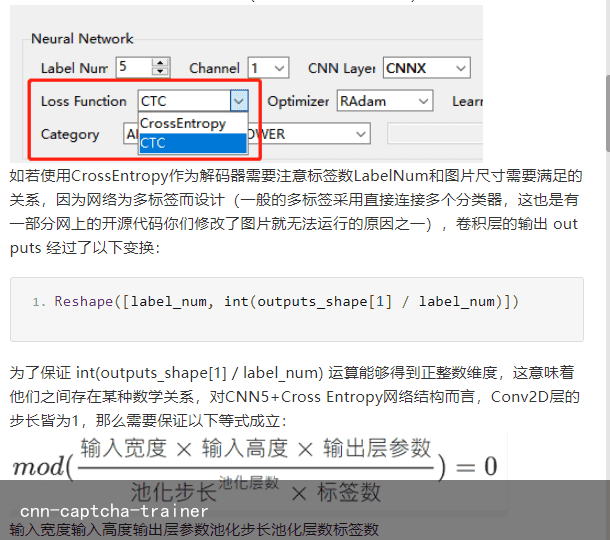
数据集下载
数据量不多有1w张验证码图片。 验证码数据集: https://pan.baidu.com/s/12iH5lpoXLAOTEiaQpoz7jg 提取码: r5ux 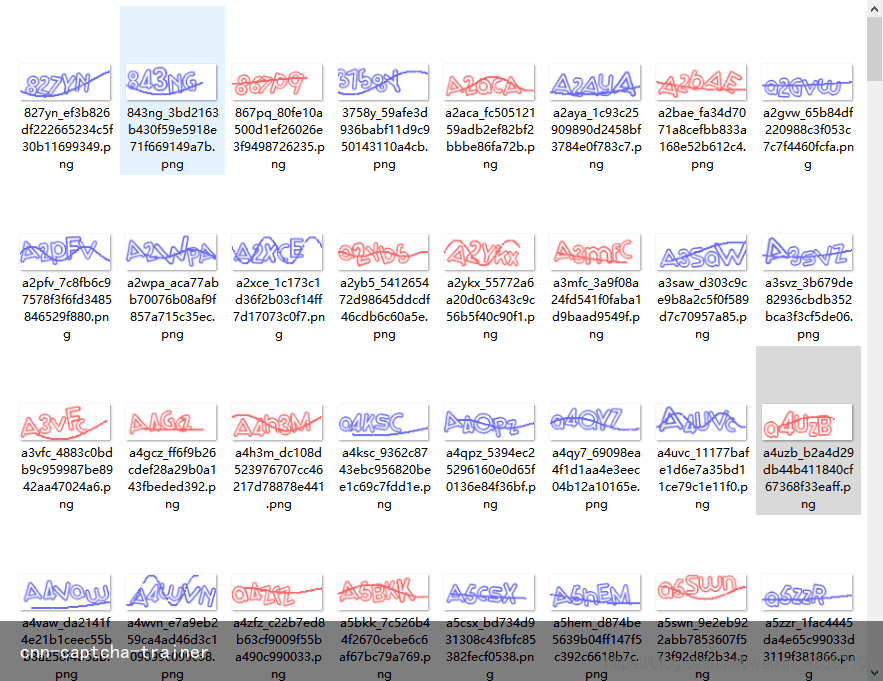
开始训练
输入项目名字,选择训练集,标签数,样本大小,结束条件等。 然后 Start Training 开始训练。
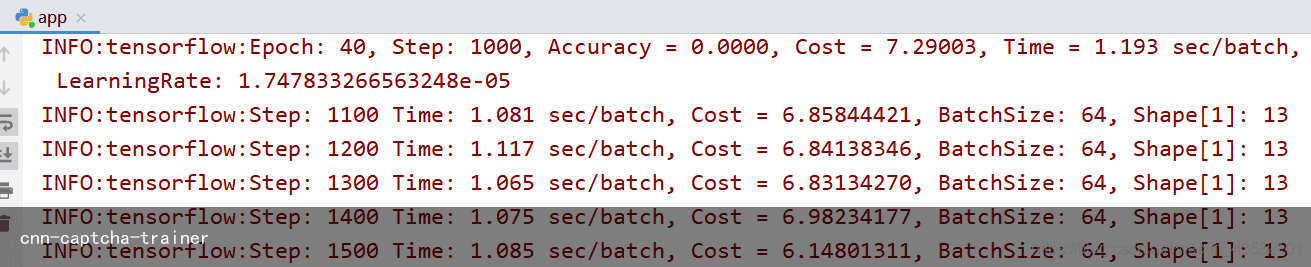
我之前安装的 tensorflow2.0.0,不太想退版本,所以使用 CPU来进行训练,训练速度较为缓慢。
建议按照作者的推荐使用 tensorflow-gpu==1.14.0。
另外为了减少时间 End Accuracy 可以修改低一点。平均损失End Cost可以高一点。学习率修改大一点。

查看训练过程 (如果感兴趣的话)
可以使用 tensorBoard 来查看训练过程。 cmd输出 tensorboard –logdir \路径\captcha_trainer\projects\weiboCaptcha-CNNX-GRU-H64-CTC-C1\model 然后访问 http://localhost:6006/ 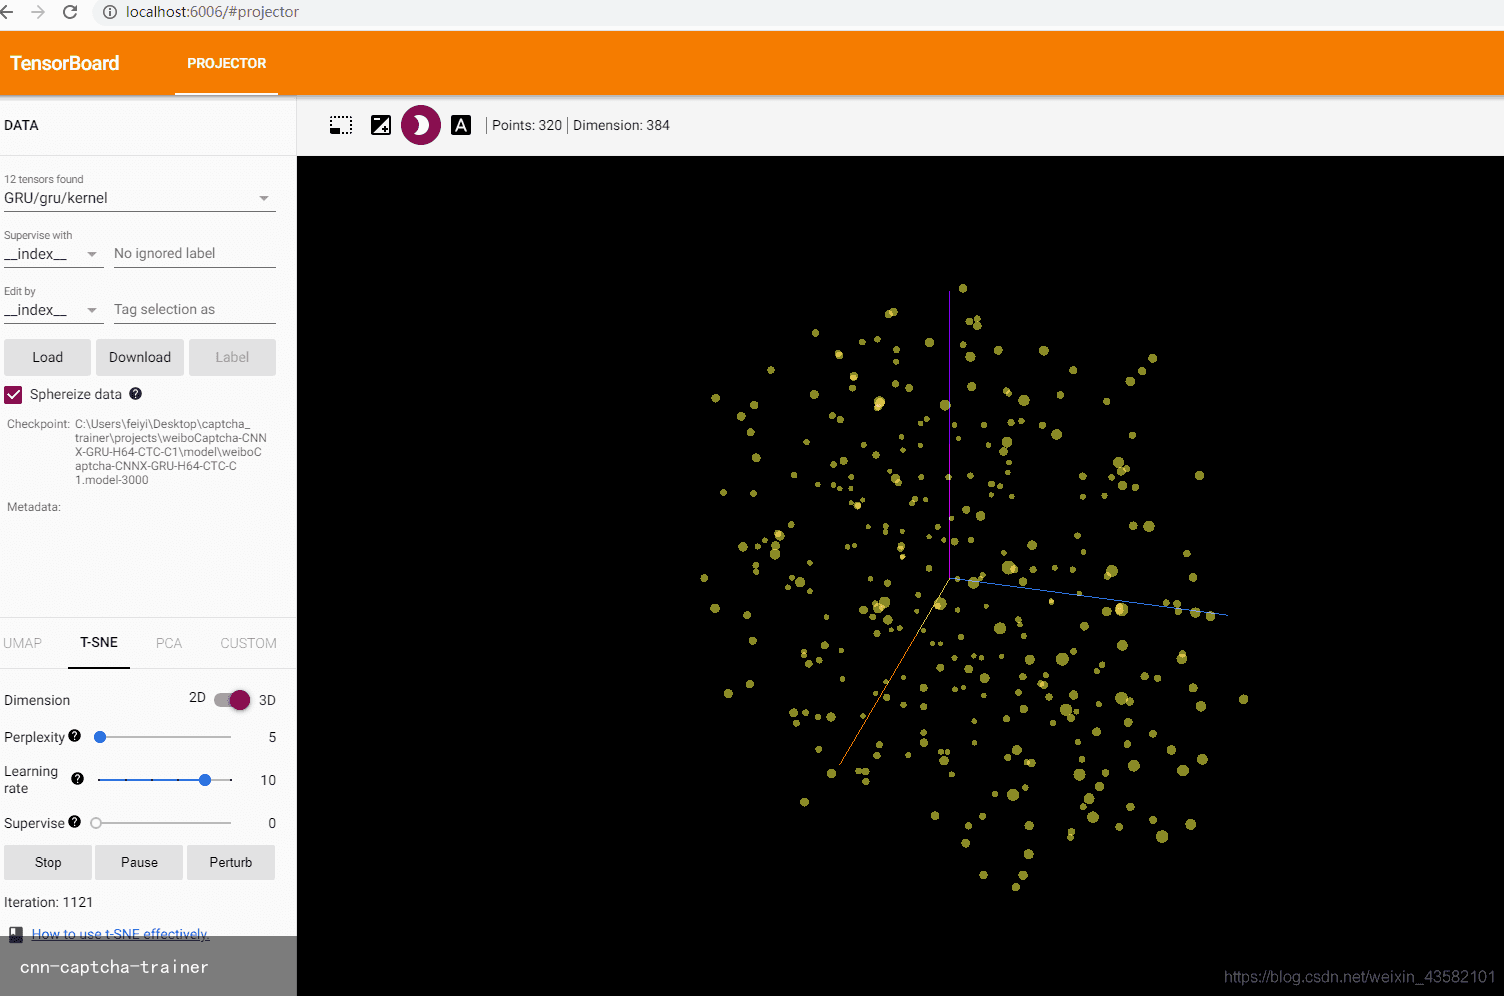 其实通过 model\checkpoint 文件也可以查看当前训练进度。
训练结束会在项目路径的out下看到以下结构的文件,pb为模型,yaml为模型配置文件,下面该到部署环节了。
部署
项目地址:https://github.com/kerlomz/captcha_platform
这里web服务调用仅作为一个例子,你可以使用项目提供的 tornado_server.py、flask_server.py 来部署,也可以使用gRPC集群远程调用。
部署方法: 将训练好的model.yaml放在模型文件夹中,并将model.pb放在图形文件夹中(如果不存在则创建),然后启动服务即可。
Informed
The default value requires that. Demonstrates. Py: an example of how to call a prediction method. The model folder is used to store model configuration files, such as model. Yaml The graph folder is used to store compiled models, such as model. Pb The deployment service will automatically load all models in the model configuration. When adding a new model configuration, the corresponding compiled model in the graph folder will be loaded automatically. Therefore, if you need to add it, please copy the corresponding compiled model to the graph path first, and then add the model configuration.
免责声明:文章内容来自互联网,本站不对其真实性负责,也不承担任何法律责任,如有侵权等情况,请与本站联系删除。
转载请注明出处:cnn-captcha-trainer https://www.yhzz.com.cn/a/13202.html