前言
ffmpeg实现了软件解码,以及导入libx264等外部库实现软编码。同时它还对各个平台的硬编解码也进行了封装,提供了统一的调用接口。本文目的就是通过实现硬遍解码h264了解这些流程和接口
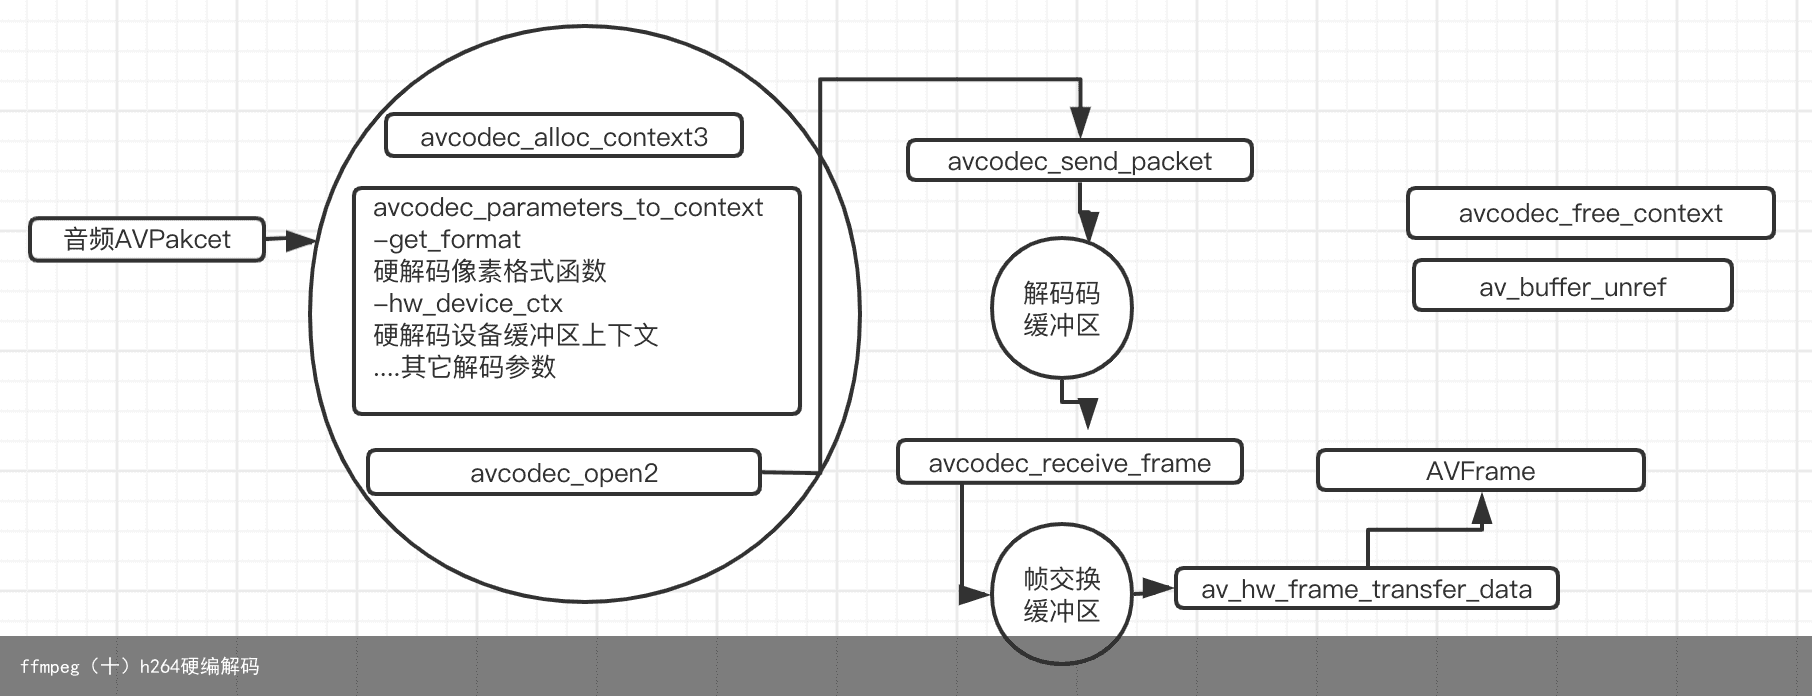
视频硬解码相关流程

视频硬编码相关流程

视频硬编解码相关函数及结构体
1、AVCodecContext 编解码结构体上下文, 对于硬解码,则需要设置如下两个变量 -get_format:此函数用于获取硬解码对应的像素格式,比如videotoolbox就是AV_PIX_FORMAT_VIDEOTOOLBOX -hw_device_ctx:此函数用于设置硬解码的设备缓冲区引用,当此参数不为NULL时,解码将使用硬解码
设备缓冲区引用:AVBufferRef类型,它用于创建和管理帧缓冲区 帧缓冲区引用:AVBufferRef类型,管理编解码时GPU和CPU数据的交换冲区 帧缓冲区上下文:AVHWFramesContext类型,设置帧缓区的相关参数
对于videtoolbox和mediacodec的硬编码,使用流程和x264的软编码一样,不需要做额外的设置,对于VAAPI等其他类型的硬编码则有另外的使用流程,具体参考ffmpeg源码examples的vaapi_encode.c
2、AVBufferRef av_buffer_ref(AVBufferRef buf); 用于创建设备缓冲区 3、void av_buffer_unref(AVBufferRef *buf); 用于释放设备缓冲区,同时也会释放其管理的帧缓冲区 4、int avcodec_send_packet(AVCodecContext avctx, const AVPacket avpkt); 将压缩数据AVPacket送入解码上下文缓冲区 5、int avcodec_receive_frame(AVCodecContext avctx, AVFrame frame); 从解码上下文缓冲区获取解码后的数据AVFrame 6、int av_hwframe_transfer_data(AVFrame dst, const AVFrame src, int flags); 如果采用的硬件解码,则调用avcodec_receive_frame()函数后,解码后的数据还在GPU中,所以需要通过此函数将GPU中的数据转移到CPU中来 7、int avcodec_send_frame(AVCodecContext avctx, const AVFrame frame); 将未压缩数据AVFrame送入编码上下文缓冲区 8、int avcodec_receive_packet(AVCodecContext avctx, AVPacket *avpkt); 从编码上下文缓冲区获取编码后的数据AVpacket
如果是videotoolbox和mediacodec进行硬编码,则没有设备缓冲区和帧缓冲区的设置,使用流程和x264一样,如果是vaapi等其它硬编码则有这样的概率,具体参考examples下的vaapi_encode.c示例
实现代码
公用代码
//
// hardDecoder.hpp
// video_encode_decode
//
// Created by apple on 2020/4/22.
// Copyright © 2020 apple. All rights reserved.
//
#ifndef hardDecoder_hpp
#define hardDecoder_hpp
#include <string>
#include <stdio.h>
#include “cppcommon/CLog.h”
#include <sys/time.h>
extern “C”
{
#include <libavcodec/avcodec.h>
#include <libavformat/avformat.h>
#include <libavutil/hwcontext.h>
#include <libavutil/pixfmt.h>
#include <libavutil/error.h>
}
using namespace::std;
class HardEnDecoder
{
public:
HardEnDecoder();
~HardEnDecoder();
void doDecode();
void doEncode();
};
#endif /* hardDecoder_hpp */
<
视频硬解码实现代码
enum AVPixelFormat hw_device_pixel;
enum AVPixelFormat hw_get_format(AVCodecContext *ctx,const enum AVPixelFormat *fmts)
{
const enum AVPixelFormat *p;
for (p = fmts; *p != AV_PIX_FMT_NONE; p++) {
if (*p == hw_device_pixel) {
return *p;
}
}
return AV_PIX_FMT_NONE;
}
static void decode(AVCodecContext *ctx,AVPacket *packet)
{
AVFrame *hw_frame = av_frame_alloc();
AVFrame *sw_Frame = av_frame_alloc();
AVFrame *tmp_frame = NULL;
int ret = 0;
static int sum = 0;
if ((ret = avcodec_send_packet(ctx, packet))<0) {
LOGD(“avcodec_send_packet”);
return;
}
while (true) {
ret = avcodec_receive_frame(ctx, hw_frame);
if (ret == AVERROR(EAGAIN) || ret == AVERROR_EOF) {
LOGD(“need more packet”);
av_frame_free(&hw_frame);
return;
} else if (ret < 0){
return;
}
#if USE_HARD_DEVICE
if (hw_frame->format == hw_device_pixel) {
// 如果采用的硬件加速剂,则调用avcodec_receive_frame()函数后,解码后的数据还在GPU中,所以需要通过此函数
// 将GPU中的数据转移到CPU中来
if ((ret = av_hwframe_transfer_data(sw_Frame, hw_frame, 0)) < 0) {
LOGD(“av_hwframe_transfer_data fail %d”,ret);
return;
}
LOGD(“这里2222 解码成功 %d”,sum);
tmp_frame = sw_Frame;
} else {
LOGD(“这里1111 解码成功 %d”,sum);
tmp_frame = hw_frame;
}
#else
LOGD(“这里3333 解码成功 %d”,sum);
#endif
sum++;
}
}
void HardEnDecoder::doDecode()
{
string curFile(__FILE__);
unsigned long pos = curFile.find(“1-video_encode_decode”);
if (pos == string::npos) {
LOGD(“file not found”);
return;
}
string srcDic = curFile.substr(0,pos) + “filesources/”;
string srcPath = srcDic + “test_1280x720_3.mp4”;
AVCodecContext *decoder_Ctx = NULL;
AVFormatContext *in_fmtCtx = NULL;
int video_stream_index = -1;
AVCodec *decoder = NULL;
int ret = 0;
enum AVHWDeviceType type = AV_HWDEVICE_TYPE_NONE;
enum AVHWDeviceType print_type = AV_HWDEVICE_TYPE_NONE;
AVBufferRef *hw_device_ctx = NULL;
type = av_hwdevice_find_type_by_name(“videotoolbox”);
// 遍历出设备支持的硬件类型;对于MAC来说就是AV_HWDEVICE_TYPE_VIDEOTOOLBOX
while ((print_type = av_hwdevice_iterate_types(print_type)) != AV_HWDEVICE_TYPE_NONE) {
LOGD(“suport devices %s”,av_hwdevice_get_type_name(print_type));
}
if ((ret = avformat_open_input(&in_fmtCtx,srcPath.c_str(),NULL,NULL)) < 0) {
LOGD(“avformat_open_input fail %d”,ret);
return;
}
if ((ret = avformat_find_stream_info(in_fmtCtx, NULL)) < 0) {
LOGD(“avformat_find_stream_info fail %d”,ret);
return;
}
// 最后一个参数目前未定义,填写0 即可
// 找到指定流类型的流信息,并且初始化codec(如果codec没有值)
if ((ret = av_find_best_stream(in_fmtCtx,AVMEDIA_TYPE_VIDEO,-1,-1,&decoder,0)) < 0) {
LOGD(“av_find_best_stream fail %d”,ret);
return;
}
video_stream_index = ret;
// 根据解码器获取支持此解码方式的硬件加速计
/** 所有支持的硬件解码器保存在AVCodec的hw_configs变量中。对于硬件编码器来说又是单独的AVCodec
*/
for (int i=0;; i++) {
const AVCodecHWConfig *hwcodec = avcodec_get_hw_config(decoder, i);
if (hwcodec == NULL) break;
// 可能一个解码器对应着多个硬件加速方式,所以这里将其挑选出来
if (hwcodec->methods & AV_CODEC_HW_CONFIG_METHOD_HW_DEVICE_CTX && hwcodec->device_type == type) {
hw_device_pixel = hwcodec->pix_fmt;
}
}
if ((decoder_Ctx = avcodec_alloc_context3(decoder)) == NULL) {
LOGD(“avcodec_alloc_context3 fail”);
return;
}
AVStream *video_stream = in_fmtCtx->streams[video_stream_index];
// 给解码器赋值解码相关参数
if (avcodec_parameters_to_context(decoder_Ctx,video_stream->codecpar) < 0) {
LOGD(“avcodec_parameters_to_context fail”);
return;
}
#if USE_HARD_DEVICE
// 配置获取硬件加速器像素格式的函数;该函数实际上就是将AVCodec中AVHWCodecConfig中的pix_fmt返回
decoder_Ctx->get_format = hw_get_format;
// 创建硬件加速器的缓冲区
if (av_hwdevice_ctx_create(&hw_device_ctx,type,NULL,NULL,0) < 0) {
LOGD(“av_hwdevice_ctx_create fail”);
return;
}
/** 如果使用软解码则默认有一个软解码的缓冲区(获取AVFrame的),而硬解码则需要额外创建硬件解码的缓冲区
* 这个缓冲区变量为hw_frames_ctx,不手动创建,则在调用avcodec_send_packet()函数内部自动创建一个
* 但是必须手动赋值硬件解码缓冲区引用hw_device_ctx(它是一个AVBufferRef变量)
*/
// 即hw_device_ctx有值则使用硬件解码
decoder_Ctx->hw_device_ctx = av_buffer_ref(hw_device_ctx);
#endif
// 初始化并打开解码器上下文
if (avcodec_open2(decoder_Ctx, decoder, NULL) < 0) {
LOGD(“avcodec_open2 fail”);
return;
}
/** 记录耗时
* 1、使用硬件解码四次,耗时如下:10.65 s,10.66s,10.75s,10.68s
* 2、使用软件解码四次,耗时如下:8.21s,8.02s,10.33s,8.00s
* 结论:对于MAC来说,软件解码耗时比硬件少,但是时间波动大?
*/
struct timeval btime;
struct timeval etime;
gettimeofday(&btime, NULL);
AVPacket *packet = av_packet_alloc();
while (av_read_frame(in_fmtCtx, packet) >= 0) {
if (video_stream_index == packet->stream_index) {
// 开始解码
decode(decoder_Ctx,packet);
}
av_packet_unref(packet);
}
decode(decoder_Ctx,NULL);
gettimeofday(&etime, NULL);
LOGD(“解码耗时 %.2f s”,(etime.tv_sec – btime.tv_sec)+(etime.tv_usec – btime.tv_usec)/1000000.0f);
avformat_close_input(&in_fmtCtx);
avcodec_free_context(&decoder_Ctx);
av_buffer_unref(&hw_device_ctx);
}
<
视频硬编码实现代码
static void encode(AVCodecContext *codecCtx,AVFrame* frame,FILE *ouFile)
{
static int sum = 0;
int ret = 0;
avcodec_send_frame(codecCtx, frame);
AVPacket *packet = av_packet_alloc();
while (true) {
ret = avcodec_receive_packet(codecCtx, packet);
if (ret == AVERROR(EAGAIN) || ret == AVERROR_EOF) {
LOGD(“wait for more AVFrame”);
break;
} else if (ret < 0) {
exit(1);
}
// 编码成功
LOGD(“encode sucess size %d sum %d”,packet->size,sum);
sum++;
// 对于编码后的h264数据 直接写入文件即可使用命令 ffplay 播放
fwrite(packet->data, 1, packet->size, ouFile);
av_packet_unref(packet);
}
}
/** 实现yuv420P编码为h264;分别用h264_videotoolbox,libx264实现
* 从代码上可以看到 采用videotoolbox进行硬件编码和采用libx264软件编码代码是一样的
*/
void HardEnDecoder::doEncode()
{
string curFile(__FILE__);
unsigned long pos = curFile.find(“1-video_encode_decode”);
if (pos == string::npos) {
LOGD(“find pos fail”);
return;
}
string srcDic = curFile.substr(0,pos) + “filesources/”;
string srcPath = srcDic + “test_640x360_yuv420p.yuv”;
string dstPath = srcDic + “3-test.h264”;
// ===这些参数要与srcPath中的视频数据对应上===//
int width = 640,height = 360,fps = 50;
enum AVPixelFormat sw_pix_format = AV_PIX_FMT_YUV420P;
// ===这些参数要与srcPath中的视频数据对应上===//
AVCodec *codec = NULL;
AVCodecContext *codecCtx = NULL;
#if USE_ENCODER_VIDEOTOOLBOX
/** 遇到问题:avcodec_find_encoder_by_name返回NULL,ffmpeg编译时h264_videotoolbox未编译进去;通过查看源码avcodec/codec_list.c即可知道未编译进去
* 分析原因:对于编码器来说,要先使用硬件加速,则需要将对应的库加进去,就跟编译进libx264一样
* 解决方案:编译ffmpeg时添加–enable_encoder=h264_videotoolbox;
*/
codec = avcodec_find_encoder_by_name(“h264_videotoolbox”);
#else
codec = avcodec_find_encoder_by_name(“libx264”);
#endif
if (codec == NULL) {
LOGD(“avcodec_find_encoder_by_name is NULL”);
return;
}
codecCtx = avcodec_alloc_context3(codec);
if (codecCtx == NULL) {
LOGD(“avcodec_alloc_context3 fail”);
return;
}
// 设置编码相关参数
codecCtx->width = width;
codecCtx->height = height;
codecCtx->framerate = (AVRational){fps,1};
codecCtx->time_base = (AVRational){1,fps};
codecCtx->bit_rate = 0.96*1000000;
codecCtx->gop_size = 10;
codecCtx->pix_fmt = sw_pix_format;
/** 遇到问题:编码得到的h264文件播放时提示”non-existing PPS 0 referenced”
* 分析原因:未将pps sps 等信息写入
* 解决方案:加入标记AV_CODEC_FLAG2_LOCAL_HEADER
*/
codecCtx->flags |= AV_CODEC_FLAG2_LOCAL_HEADER;
#if !USE_ENCODER_VIDEOTOOLBOX
// x264编码特有的参数
if (codecCtx->codec_id == AV_CODEC_ID_H264) {
av_opt_set(codecCtx->priv_data,”reset”,”slow”,0);
}
#endif
if (avcodec_open2(codecCtx,codec,NULL) < 0) {
LOGD(“avcodec_open2() fail”);
avcodec_free_context(&codecCtx);
return;
}
AVFrame *sw_frame = av_frame_alloc();
sw_frame->width = width;
sw_frame->height = height;
sw_frame->format = codecCtx->pix_fmt;
av_frame_get_buffer(sw_frame, 0);
av_frame_make_writable(sw_frame);
int frame_size = width * height;
int frame_count = 0;
FILE *inFile = fopen(srcPath.c_str(), “rb”);
FILE *ouFile = fopen(dstPath.c_str(), “wb+”);
while (true) {
if (codecCtx->pix_fmt == AV_PIX_FMT_YUV420P) {
// 读取数据之前先清掉之前数据
memset(sw_frame->data[0], 0, frame_size);
memset(sw_frame->data[1], 0, frame_size/4);
memset(sw_frame->data[2], 0, frame_size/4);
if (fread(sw_frame->data[0], 1, frame_size, inFile) <= 0) break;
if (fread(sw_frame->data[1], 1, frame_size/4, inFile) <= 0) break;
if (fread(sw_frame->data[2], 1, frame_size/4, inFile) <= 0) break;
} else if (codecCtx->pix_fmt == AV_PIX_FMT_NV12 || codecCtx->pix_fmt == AV_PIX_FMT_NV21) {
// 读取数据之前先清掉之前数据
memset(sw_frame->data[0], 0, frame_size);
memset(sw_frame->data[1], 0, frame_size/2);
if (fread(sw_frame->data[0], 1, frame_size, inFile) <= 0) break;
if (fread(sw_frame->data[1], 1, frame_size/2, inFile) <= 0) break;
} else {
LOGD(“unsuport”);
break;
}
sw_frame->pts = frame_count;
frame_count++;
encode(codecCtx, sw_frame,ouFile);
}
// 刷新剩余未编码完的数据
LOGD(“文件数据读取完毕”);
encode(codecCtx, NULL,ouFile);
// 释放资源
avcodec_free_context(&codecCtx);
av_frame_unref(sw_frame);
fclose(inFile);
fclose(ouFile);
}
<
遇到问题
1、avcodec_find_encoder_by_name返回NULL,ffmpeg编译时h264_videotoolbox未编译进去;通过查看源码avcodec/codec_list.c即可知道未编译进去 分析原因:对于编码器来说,要先使用硬件加速,则需要将对应的库加进去,就跟编译进libx264一样 解决方案:编译ffmpeg时添加–enable_encoder=h264_videotoolbox; 2、编码得到的h264文件播放时提示”non-existing PPS 0 referenced” 分析原因:未将pps sps 等信息写入 解决方案:加入标记AV_CODEC_FLAG2_LOCAL_HEADER codecCtx->flags |= AV_CODEC_FLAG2_LOCAL_HEADER;


